I originally posted this as a Valentine’s Day gift wrap idea, but it also works for a beautiful holiday gift wrapping design. Enjoy this repost!
Category Archives: All Things Christmas!
ALL THINGS CHRISTMAS #3!
REPOST: TOP 10 HOLIDAY WRAPPING HACKS & TIPS (Originally posted December 2019)


Invest in a few more expensive gift embellishments.
1. Designate one paper design to each member of your family! I sometimes do this and completely omit the tags. I purchase a roll of a paper for each member of my immediate family. This saves the hassle of tagging and prevents them from peeking, as there are no names on the gifts! I use other random papers for gifts that will be leaving our house…extended family, friends and co-workers.
2. Budget hack: Invest in a few more expensive gift embellishments, but reserve them for immediately family. This allows you to re-use them year after year.
3. Gift Boxes: I have a large tub of gift boxes that I use over and over again. Not only does this mean I always have a stash of boxes, but also that the sizes of boxes I use are pretty standard. I have a variety of styles, so that once under the tree, they are not all typical shirt boxes. I also wrap with varied focal points, so some are off centre or even positioned vertically to add interest.
4. Good quality ribbon can get very pricey. By using the same boxes from year to year, I can actually re-use my ribbon/embellishments as well. In fact, sometimes I just slide on a previously tied ribbon with decorative elements still tied on from the year before. (PS When you do buy new ribbon…wait for the 70% sale!)
5. The paper gets recycled once gifts are opened, but everything reusable is kept. (Ribbon, gift decorations and even the tags!) My paper changes. but I am often able to incorporate my gift decor complete with attached tags, from Christmas to Christmas. For example, my daughter might receive a gift in the exact same box with same ribbon, embellishments and tags every year. She doesn’t even realize it because the paper and gift are new! (You know what they say KISS – Keep It Simple Stupid)
6. Everyone loves a TAB TOP surprise! Save your tab top cans (Eagle Brand milk) and create a fun opening experience! Follow the link to check out my video to see how it’s done!


7. Now that I’m wrapping for tutorials, I obviously don’t do this, but for years, my strategy was always the same. I would spend hours wrapping every last gift. NO TAGS. NO RIBBON. NO EMBELLISHMENTS. I would simply print the name on the underside of the gift (tiny so it really wasn’t noticeable). I would “decorate” the gifts on a totally separate day. I would take out my stash of previously used ribbon and embellishments and re-use as much as possible. This would often just entail a few minor adjustments and perhaps (but not necessarily) a new tag. I would then create new looks for gifts that could not work with items from my previous creations due to size or colour. This method saves lots of time and money.
8. STOCKING STUFFERS: (This isn’t necessarily a wrapping tip, but I always wrap every gift in the stocking!) I always try to include a variety of items in the stockings. I try to get at least one item per category: Something to WEAR, EAT, READ, USE, and DO. I will often use the dollar store metallic paper and/or decorative tissue to wrap stocking items. I find these papers to be super pliable and easy to work with. For example, you can easily wrap a pair of socks without a box because the paper is flexible and simple to work with. I will be posting some tutorials of how I wrap stocking stuffers using this dollar store paper over the next few days, so stay tuned.

9. Wrapping Paper Cutter – I just got two of these to help with my wrapping. They work great, but don’t fit around larger paper rolls. Most of my rolls are standard size, so it’s fine, but something to be aware of if you consider purchasing one. The paper cutters make a nice straight cut and are easy to use….love them! They work well for storing paper as well, but then you’d need one for every roll. I use my DIY toilet paper roll storage system and just reserve the blades for cutting.
10. Upcycle and Repurpose anything and everything! Some of my favourites gift wrapping upcycles are jewellery, Christmas Cracker Wired Embellishments and cellophane which I love to use to make paper flower style bows.
Hopefully you’ll find some of these tips helpful….Happy wrapping!
ALL THINGS CHRISTMAS #2!

REPOST: Gift Wrapping Tips: Post 1 (Original post December 5, 2013)
I love to decorate gifts. Back in the “olden days” when I didn’t have so much on my plate, I would be done my Christmas shopping by the end of October and be completely wrapped and ready to go by the end of November. I’ve come to accept that my years of getting all my shopping done early are over. I now to do most of my shopping online and tend to leave the bulk of it until Black Friday and Cyber Monday. I still try to support local when possible, but have definitely been sucked in by the convenience of shopping from home. I’ve never been much of a shopper (other than thrift stores of course). I’m not a browser and wouldn’t think of going to the mall just “for something to do”. When I go shopping I’m generally on a mission, with a list in hand. It just does nothing for me.
Regardless of how early I complete my shopping, I always use the same system for wrapping.
- Basically, I wrapped all the gifts in one sitting (or at least most of them). This might take me several hours, but I find it works best for me. Binge wrap!
- I do not add any ribbons, bows, tags or embellishments at this time. I simply choose paper, wrap and then write the person’s name (very small) on the bottom of the gift.
- This allows me to stack and store oodles of gifts without having to compensate for the bows.
- I then set aside another block of time (several hours) and set to work decorating each gift. I love to do this and I thought I’d share a few of my favourite tricks!
Wrapping on a Budget
First of all, I spend very little on wrapping paper and embellishments. I always purchase materials when Christmas stuff is on clearance. I often pick up beautiful wire rimmed ribbon at Michael’s for up to 90% off. I also purchase many of the items I use from the dollar store. It’s all about how the items are used and combined with other elements. The example I am sharing today includes mostly dollar store items.


For this particular project, I used dollar store wrapping paper and dollar store wire rimmed ribbon. I can’t remember if I bought the wire holly garland and metallic shreds at the dollar store or not, but probably. I had both on hand from last year.
I tend to use primarily wire rimmed ribbon. I will occasionally use the curly ribbon, but most often to dress-up the embellishment a bit. I wrapped the gift with one band of ribbon and tied a nice big bow. (Did you know a BOW on a gift represents family ties and the fact that we should be tied together in bonds of goodwill?) I then slipped a bit of metallic shreds beneath the bow. The shreds are not silver or gold, but rather that clear “opalescent” look. (Don’t you love that word?) I love how it just punches up the bow and seems to fill the dead space a bit. I then like to take a 6 to 8 inch piece of wire garland and slide it under the shreds and then twist it on top of the bow to hold everything in place. I like to leave the ends of the wire garland sticking out. This look is really easy to achieve and yet takes a simple ribbon and bow and kicks it up a notch. I often choose gift tags with a string. I just prefer the “hanging” look over stickers. Such is the case with this tag. I just looped it over the wire garland.
You already know how obsessed I am with re-using and re-purposing items, so I am sure you won’t be all that surprised to know that I collect the ribbons and bows on Christmas morning and re-use many of them the following year. I have even been known to leave the tags attached and use it for the same person. Thus, my stash of beautiful ribbons and bows does not need to be replenished that often.
ALL THINGS CHRISTMAS #1! Cellophane Bows
I decided to dive into the archives throughout December and do some re-posting! I certainly hope to including some new posts as well, but watch for my daily posts about ALL THINGS CHRISTMAS…mostly a trip down memory lane re-visiting posts from Decembers past!
Gift Wrapping Tips: Post 2 (original post December 8, 2013)
I love all things pretty, but am also very frugal. Cellophane is one of my secret weapons when it comes to making gifts look great on a budget. Of course, you can pick-up a roll for a buck and get numerous bows out of one roll.

I purchase printed cellophane, solid colours and also love the look of the clear.
Cellophane Bows:
-
- Purchase dollar store cellophane and cut off 2 to 3 strips. I generally make my strips the about 4 inches wide and the length is equal to that of the width of the roll. The size can be altered to fit the size of the gift you are decorating.

This bow was made with only two strips of cellophane.
- Stack the strips.
- Scrunch up the strips in the center so that the entire strip is gathered together in the center. (You know, similar to the tissue flowers we made back in the 70’s!) The YouTube video gives a great tutorial for making the tissue flowers, but these are much easier. Less layers, no folding (just scrunch), no trimming the ends to form a petal shape and less to pull apart after.

Scrunch up the cellophane in the center of the strip, until the entire length of the strip has been gathered up.
- With the center pinched tightly, tie a string or ribbon around the cellophane to secure it in the middle . You can tie it onto the gift at this stage or after the flower has been pulled apart. Regardless, the final step is to pull the layers of cellophane apart to create a very full looking cellophane flower.
- Purchase dollar store cellophane and cut off 2 to 3 strips. I generally make my strips the about 4 inches wide and the length is equal to that of the width of the roll. The size can be altered to fit the size of the gift you are decorating.


I always incorporate a few other things to finish off the gift. In this case, the final look was made with these three items:

Green Raffia, Polka Dot Cellophane and White Star Wire Garland

Cellophane Bow

Cellophane Bow
The thing I like best about cellophane is that you can create any kind of look you want depending on the colours and patterns you use. The ribbon and other embellishments can make you gift look fun or elegant, depending on what kind of look you are going for. Get creative and see what you can add to your gifts to dress-up a simple cellophane bow!
Front Porch Decor: A Wintery Welcome!

Last spring/summer, I was on a mission to give our front porch a facelift. It is a beautiful outdoor space, but I had never taken anytime to make it anything more than a place to sit. The overhaul involved several DIY projects and repurposing items we already had. I was really pleased with how it turned and we spent lots of time truly enjoying the new porch decor over the summer months. However, when fall rolled around, I quickly realized that the design was much more suitable for summer and that I would need to somehow “winterize” the look.
Over the past few months, I haven’t had much time for projects, but I did spend several hours gathering ideas and materials. Last weekend, I finally took the time and pulled many of them together to create a new look for winter and Christmas. I didn’t want it too be too Christmassy because I really didn’t want to have to rethink the space when the holidays are over. I think I managed to create a look that has a hint of Christmas, but with a few minor changes, it can transition into a look that will last the entire winter.
To achieve the look, I incorporated some of the pieces that I had used in my summer porch design such as the milk can and the Welcome sign. I may make a Christmas sign at some point, but for now this will work.
I had originally made this rustic tree branch tree for my front porch, but in the end, loved it so much that I decided to place it in the living room because our main tree is always set-up in the dining room where there is more room. We have a wood burning fireplace in the living room and having a smaller tree in this space will be perfect. (It is yet to be moved as we won’t be getting our live Christmas tree until next weekend!)

Pallet Trees:
I love the look of pallet Christmas trees and decided to pick some up through Kijiji. Although there are many places that offer them for free, I ended up purchased two for $30. That might seem silly but they were already stained a dark brown colour and there were no spaces between the planks, so there were plenty of planks to work with.


- The first thing I needed to do was dismantle the pallets. This is never a fun job, but I opted for what I deem to be the simplest solution. Use a sawzall!
2. Once the pallets were taken apart, I began to cut, build and assemble. I followed this tutorial from Funky Junk Interiors. I absolutely love the tree she created with old fencing, but I didn’t have the time or energy to recreate the look. The tutorial is super easy to follow and the only change I made was making the bottom plank on my largest tree larger so that the finished tree would be taller. I was on a bit of a roll and ended up making two larger trees for my front porch as well as three smaller ones…and I still have wood left.


3. Once my trees were built, I opted to finish off the look by adding some white using the “dry brush” technique. (Dry brushing is really just what it implies…you add a very sparse amount of paint using a very dry brush and apply it with very light strokes. This may also mean removing some of the paint you put on brush before actually applying it to the surface of your project. I will often use a scrap piece of cardboard to brush off the excess paint before applying it to my project.) Because the pallets were already stained a dark brown, white was the perfect finishing touch. It was well worth the $30 for all the extra planks I got as well as the time saved not having to stain and dry before applying the dry brushed white coat.
Other Elements in the Design:
- I absolutely love the look of birch and had purchased some birch scrap wood a few weeks back knowing I wanted to somehow incorporate it into my finished project. I decided to use the milk can I already had as a “vase” for the birch. I wrapped the branches in twine, added a simple embellishment and a few sprigs of white “ting” to finish off the arrangement.

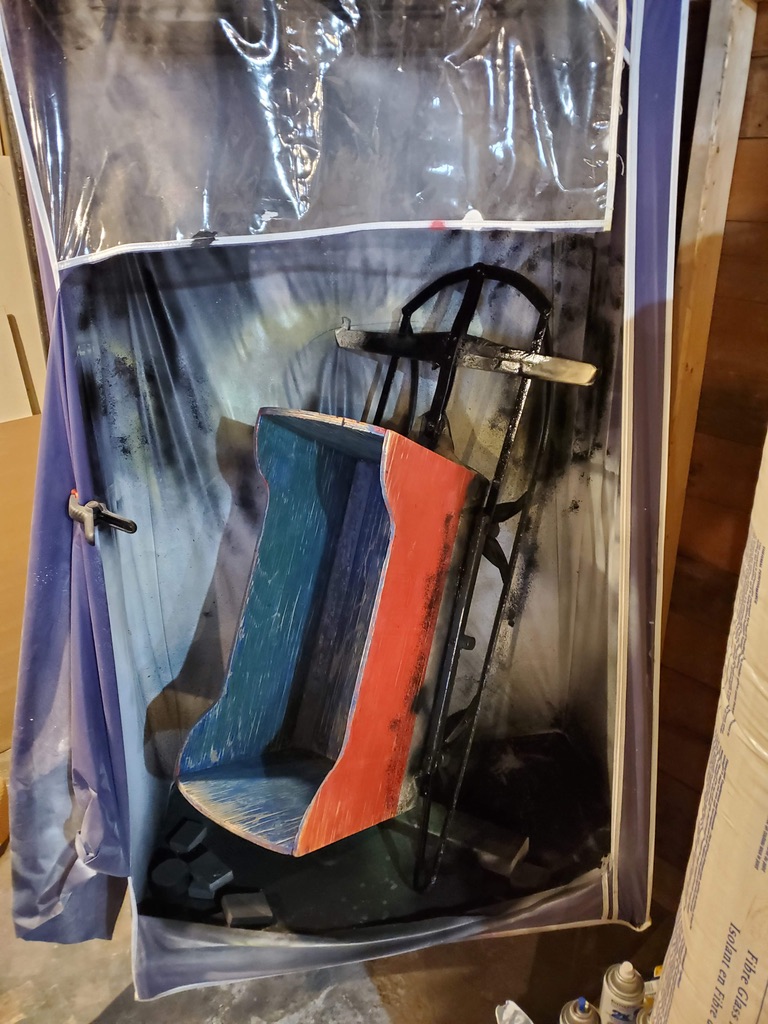
- As mentioned before, I knew that I didn’t want the decor to be too Christmassy, so I aimed at more of a winter look. I found this old rotting sleigh on Kijiji for $30. I scraped and sanded it to removed most of the peeling paint and then gave it two coats of exterior white paint. Once thoroughly dry, I sanded it back to distress it slightly. I also gave the metal gliders a coat of black spray paint in my spray tent. I love the way it turned out. All I added to the sleigh was a plaid blanket that I picked up for a few bucks at a thrift store.


- The front door holds the rag wreath that I made a few years ago. I still love the white shabby chic look.

- On the opposite side of the front door, I placed a small artificial tree. I decorated it very simply with white lights, pinecones and tufts of white artificial snow. I purposely chose not to use ornaments as I figured the simple wintery look would allow me to leave the display up through the winter. ( I guess I could also use ornaments and then replace them with pinecones/snow after Christmas!?…Maybe next year!)

- I picked up this beautiful antique speckled pot at an antique sale this fall. I love it and it is the perfect container for the collection of dollar store snowballs!

- I used scrap wood to create these simple wooden presents that can be removed after Christmas. Once again, I applied white paint using the dry brush technique and then added burlap and twine for a simple rustic look.

- The finishing touches: To finish off my winter/Christmas vignette, I added a few garage sale finds…..a vintage suitcase, an antique sewing machine drawer filled with pinecones and a very weathered chair (not bad for a $1). I also used a grapevine wreath I had in my basement, a galvanize pitcher and lantern from my summer decor and an antique type writer with the beginnings of a “letter to Santa”. (I will remove the typewriter after Christmas.)


I love the way it all came together in the end. Sometimes it is hard to envision what the finished design will look like. I had so many ideas and items I wanted to incorporate, but really had to wait until I set it up to see what would work and where.
I’m already planning a fall porch design for next year….a back to school theme. I already have something on my “To Do List” for next summer! Yikes!!
Rustic Christmas Tree

So excited to finally share this project! Being a teacher, this has been an incredibly challenging year….especially in Kindergarten where our program is based on hands-on learning, social skill development and play. For the first few months, I was running on empty and just couldn’t muster up the energy or motivation to do any projects or blogging. Unfortunately, both are also a huge component of my personal wellness, so I knew it was essential to carve out some time and get creative!
I came across a picture a few months ago and it wasn’t even “pinable” (not sure if that is a word), but I wasn’t able to “Pin” the picture to my Christmas Board on Pinterest. I ended up taking a “snip-it” and didn’t even think about getting the website, so I have no idea where I even found it (and thus I’m not sharing the original because I can’t even find it now)….I just kind of happened upon it. The bottom line is I can’t take credit for this idea…it’s a copycat at best! Anyway, I absolutely fell in love with the style of this tree and was determined to make my own. Because I couldn’t find the source when I went to make it, I had to use the picture as a guide and make my own plan of execution. I’m so happy with how it turned out!
Rustic Christmas Tree:
Materials Needed:
- branches
- air nailer (I can’t imagine tackling this project without one.)
- Saw
- wire
- Grape Vine or Virginia Creeper
- Decorations (white lights, pinecones, star, wooden snowflakes, gold ornaments)l
- Hot glue gun/glue

Gather branches. Mine ranged in size from about 3/4 inch in diameter to approximately 1 1/2 inches. I had no idea how many to collect, but all I can say is I used lots. I didn’t actually count, but I am going to guess 60 pieces. I looked for straighter pieces, but quickly realized that is virtually impossible and the bends and curves add extra character to the tree. I brought home larger branches and then cut them down to workable lengths. (All of the wood I collected was yard waste that I gathered from back lanes during fall yard clean-up.) My branches came from a variety of trees and I think the differences in the colours and textures of the various barks add interest.

I started by building a square base with four of the branches. I cut them to approximately 12″ in length and then nailed the ends together to form the square. I also wrapped the corners with some wire to ensure they were secure. A strong foundation is key!


Build the frame. I then used 4 longer branches to establish the desired height of the tree. (My tree is just shy of 5 feet tall with a finished diameter of about 22″.) I used the air nailer and wire to attach and secure one branch inside each of the corners of my square base. I brought the tops together to form a “teepee” like shape and secured them together as well.
Once I had the frame built and firmly secured, I began to attach the smaller branches. I cut about 20 pieces varying in length from about 10″ to 14″. As I began to build I realized that in some spots, longer or shorter pieces seemed to work better. DO NOT cut them all to the same length. I found that after the first batch, I would only cut about 6 at a time and often looked at the branch shape to see where I might use it and what length would make sense to secure it properly. Although some of the branches were placed at very slight angles, a majority were angled but oriented much closer to vertical than horizontal. You really have to eyeball it and place your pieces together strategically, almost like a puzzle. WARNING….an air nailer certainly makes this job easier because you don’t have a hard backing/surface to hammer against….the downside is that it can be dangerous. I can testify to this as I air nailed through my index finger…OUCH!! Don’t do that. I was so excited that I got a little sloppy with my safety and wham. Hardly bled, but the pain and throbbing was almost unbearable. Proceed with caution. Even with the injury, this project was well worth it!

Once you have all your pieces in place, stand back and eyeball each side to make sure there aren’t any gaps that need filling. When your tree has passed the test….take your vine (I used Virginia Creeper because I have lots of it in my backyard) and wrap it around the branches. Use wire to secure it in place.
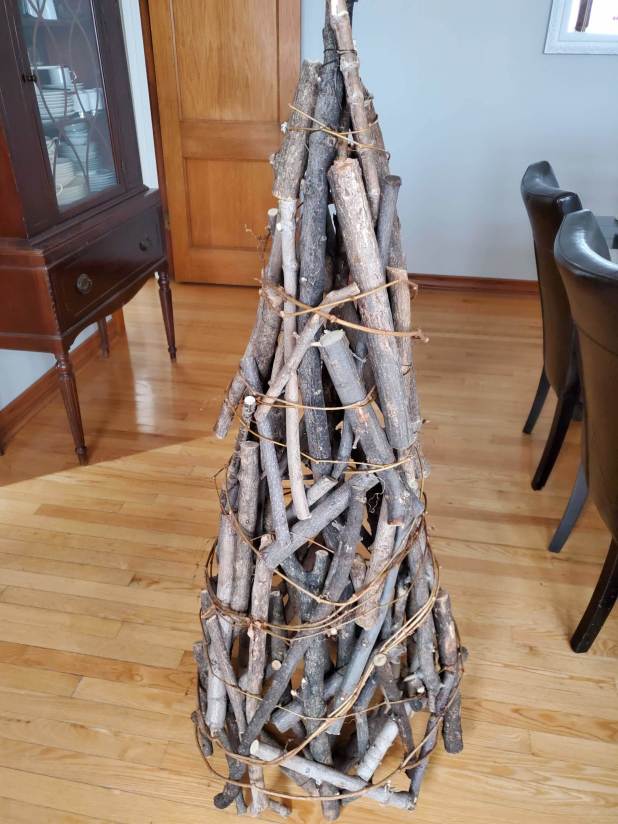
The tree itself is now finished and the fun begins….start decorating! Obviously, you can decorate it however you want, but my only advice is LESS is MORE! I opted for some fairy lights, some very soft gold ornaments (I used 4) that I bought in a set at the dollar store, wooden snowflake ornaments (again I bought these at the dollar store), pinecones and a star for the top. I bought an awesome set of felt stars from the dollar store and used one for the top.


When I began this project, the intent was to make it a focal point in my “Winter/Christmas” front porch design. I’m hoping to pull that together this weekend, but in all honesty, I love this tree so much that I’m not sure if it will end up outside or not. Most years we have set our tree up in the corner of our dining room because it’s always large and the dining room accommodates it best. Our living room is on the smaller side and with so many elements that can’t be moved (French doors, fireplace, wall mounted TV and radiator) options are limited. It just doesn’t work well! A part of me thinks this would look amazing tucked in a corner of the living room instead of on the porch. I’ll have to see how the porch comes together before I decide, but for now it is a place holder for our real tree that we’ll buy after the first of December!
It’s All About the Paper!
This paper makes a statement all on its own. It’s like “chalkboard glam” or something! For this design, I use a layered iridescent white ribbon topped with a very narrow black and white polka dot ribbon that blends beautifully with the paper. I add in a few strands of iridescent curly ribbon, iridescent present stuffing, wire snowflake garland and an inexpensive snowflake ornament. If you’ve been following my Youtube channel you already know that decorative wire garland and shredded present stuffing are two elements I use all the time. Both are MUST buys. They are super inexpensive to use because you only use about 5″ or 6″ of the garland and a few strands of the stuffing. Both elements a great for adding finishing touches that create more interest and dimension in the design. Check out this one minute tutorial to see how it’s done!
Leave your email to the right and see my most current posts as they are published. Check out All Things Christmas! and BOWhemian WRAPsody in the side bar for previous Christmas ideas, recipes, tips and tutorials! Don’t forget to LIKE, SHARE and SUBSCRIBE to my youtube channel as well….BOWhemian WRAPsody. Follow the link to see all of my holiday gift wrapping videos!
Holiday Gift Wrapping Ideas: Pom Poms, a Star & Candy Jars!

Love this candy jar Christmas wrapping paper. It has just the right amount of sparkle and colour without being over the top! I decided to use a traditional satin ribbon in this design. There is no wire in the ribbon, so I opted to knot it and forgo the bow. Instead, I pull in some silver netted ribbon. This is a great element because it really holds its shape nicely. I rarely wrap or tie bows with it, but rather gather a small strip in the center and tie it where I’ve scrunched it together. In essence, this process creates a bow. It is tied in place with ordinary silver curly ribbon. The other elements I use are green wire pom pom garland and Christmas cracker decorations. My sister in-law always buys crackers (from Costco I think). The ends of the crackers have ribbon and these cute little wires with balls at the ends. Every year they are slightly different, but always the same concept. I collect them from all of the guests and use them for all kinds of projects. Anything with wire has amazing potential…I love to create designs with a 3D aspect to them and these little gems are perfect.
Leave your email to the right and see my most current posts as they are published. Check out All Things Christmas! and BOWhemian WRAPsody in the side bar for previous Christmas ideas, recipes, tips and tutorials! Don’t forget to LIKE, SHARE and SUBSCRIBE to my youtube channel as well….BOWhemian WRAPsody. Follow the link to see all of my holiday gift wrapping videos!
READY, SET, WRAP! Candy Style
When it comes to wrapping cylinder gifts…candy style is my #1 technique to tackle them, especially when they are long and skinny. This is one of my favourite ways to wrap stocking stuffers. I’ll often end up adding items like dry shampoo, body spray, etc. The key to wrapping gifts candy style is all in the paper you use. My “go to” paper is the double-sided foil paper from Dollarama. It is super pliable and the double-sided feature makes the ends look great! I also use this technique to wrap stocking stuffers that will fit into a toilet paper roll or cut down wrapping paper tube. In fact, I bought some specialty gel pens for a stocking stuffer this year and a wrapping paper tube was the perfect disguise. Try out this super simple form of wrapping!
Leave your email to the right and see my most current posts as they are published. Check out All Things Christmas! and BOWhemian WRAPsody in the side bar for previous Christmas ideas, recipes, tips and tutorials! Don’t forget to LIKE, SHARE and SUBSCRIBE to my youtube channel as well….BOWhemian WRAPsody. Follow the link to see all of my holiday gift wrapping videos!
Holiday Gift Wrapping Ideas: Off-Set Focal Point
In today’s holiday gift wrapping tutorial, I demonstrate how to incorporate an inexpensive floral pick into my gift wrapping design. The one I use is quite long, so I off-set the focal point to accommodate the length. I’m quite drawn to asymmetrical designs and will often do this, especially for oblong gifts.
I am very committed to reusing any supplies I can. This particular ribbon has been used for several years and still has the gift tag attached from last year! I love how the glittery polka dot pattern on the ribbon compliments the colours in the paper so nicely. The final material I use in this design is 1/2″ metallic ribbon.

The key to this design is not only the off-set focal point, but also the use of a ribbon shredder to create thin slices of metallic ribbon. I love the “messy” look of thinly shredded ribbon. Although you could curl it as well, I often just mess it up!
Leave your email to the right and see my most current posts as they are published. Check out All Things Christmas! and BOWhemian WRAPsody in the side bar for previous Christmas ideas, recipes, tips and tutorials! Don’t forget to LIKE, SHARE and SUBSCRIBE to my youtube channel as well….BOWhemian WRAPsody. Follow the link to see all of my holiday gift wrapping videos!