Santa Cookies

I haven’t made my Santa cookies yet this year, but have made them for the last few years. I use my basic brown sugar recipe and a heart cookie cutter. These sugar cookies are super moist and chewy, so it is my “go to ” recipe for cookie decorating. The down side is that you do have to be a bit careful with the cookies so they don’t break. When I decorate cookies that require more time, I generally will not do a full batch. I will make a few dozen and add one or two to a baking tray, or if I am sending them to school, I will make a class set. They take quite a bit of time to make and some times the fun is lost when you have already decorated 4 dozen and still have 24 cookies left to do. I find that I do a better job when I decorate the cookies in a variety of ways. I get bored easily and like to switch it up, so will often used a few different cutters within the same batch of cookies.

Santa Cookies

Ingredients:

  • Brown Sugar Cookie Recipe
  • Heart shaped cookie cutter
  • icing (I often use a buttercream icing, but you could use the Royal Icing recipe as well)
  • red coloured sugar crystals (Bulk Barn)
  • red and brown mini M & M’s (I buy these at Bulk Barn and carefully pick through to get mostly brown and red with the scoop – no fingers, of course!)
  • red candy sprinkles

Method:

  1. Cover the tip of the heart with icing and then add the red sugar sprinkles to cover it completely.
  2. Pipe on the fur on the hat, pom pom and the beard around the two round parts of the heart.
  3. Carefully set in two of the red candy sprinkles to create a mouth for your Santa.
  4. Use Royal Icing or melted chocolate to glue the M & M’s on for eyes and a nose.

Have you ever considered working from home? A revolutionary blogging system has hit the market.  If you are interested in learning how to blog and earn money from home, you need to click this link.


Cashew Almond Chocolate Crunch

I had cut this recipe out of Chatelaine about two decades ago…seriously, I haven’t had a subscription since I first started teaching. (Too bad I am old enough to actually count back in decades…UGH!)  Anyways, have never made it, not once. I often make something called Almond Roca. I had totally planned to make it again this year (and may still), but came across this recipe and thought I might try something new. It was super easy to make and turned out to be very tasty. Although it is not the same as Almond Roca, it somehow seems similar to me. I think the recipe might have originated from Hershey’s, but I couldn’t seem to find it to post the link.Cashew Almond Chocolate Crunch

Cashew Pecan Almond Chocolate Crunch

Ingredients:

1 350g package of semi-sweet chocolate chipits

3/4 cup coarsely chopped cashews (I used pecans because I had them on hand)

3/4 cup slivered almonds

1/2 cup sugar

2 Tablespoons corn syrup

Method:

  1. Line 9″ square pan with foil, extending over the edges. Grease foil. Cover the bottom of the pan with the chocolate chipits. *You may want to reserve a few to sprinkle on top at the end.
  2. Combine remaining ingredients in large frying pan. Cook the mixture on low, stirring until butter has melted. Increase the heat to medium and cook, stirring constantly until mixture comes together and turns light golden in colour.
  3. Pour the hot mixture over the chocolate chips. Spread evenly. (I sprinkled the top with a few extra almonds and chocolate chips.) Cool until chocolate is firm. Remove from pan. Peel off foil. Cut or break into pieces. Store in a cool, dry place.

Makes about 1 1/2 pounds of candy.  I am not sure, but I think this might be impossible to mess up. It was so easy to make and very yummy alternative to the Almond Roca that we usually make.

If you are interested in learning to blog, do not miss this opportunity to learn how the pros blog with a revolutionary new blogging platform.  Click here to learn more.

Cookie Decorating Stage 2

I committed to dropping off a tray of baking in appreciation for all of the hard-working teachers at my children’s school, but haven’t had time to get my baking done yet ~ so a marathon it is! I picked up supplies on the way home from work last night, whipped up some left over burgers from the night before and began a baking blitz around 6:45 p.m. I made a couple of our favourites….Chocolate Fudge and  Peanut Butter Marshmallow Squares. I also tried a few new recipes…Red Velvet Brownies with Cream Cheese Icing, Cashew Almond Chocolate Crunch and Cookie Dough Truffles. (I will let you know how they turn-out as I haven’t sampled anything yet!) I had already made my Brown Sugar Cookies, Stained Glass Cookies and Shortbread, but still needed to decorate them. For the sake of time, I only decorated a few of the Brown Sugar Cookies for the platter I will be sending to the school today. (Thank goodness it is my day off).

The Finishing Touches:

decorating tipOnce you have created a nice smooth surface using the Royal Icing recipe I shared yesterday, you want to let your cookies set. I popped mine in the freezer until I was ready to add the decorating details. You are now ready to do the fun part ~ decorate! My husband thinks I am crazy, but I really love to decorate and cookies are no exception. I can literally spend hours completing a batch. Unfortunately, in order to get this platter ready, I don’t have that kind of time. It took me about 15 minutes to decorate these cookies. I used my Pampered Chef Icing Set with a Wilton Round Tip #2. I only had a small amount of Royal Icing left from when I completed the surfaces of the cookies and it was already in the tube and ready to go (the recipe makes a large batch, but we had used it for making gingerbread houses, so it was just what was left over). I stored the left over icing in the actual tube in the fridge, but wrapped it in cellophane so that the icing would not dry out through the tip. It did not harden at all and worked well. I don’t like much colour on my Christmas cookies. I tend to keep things fairly neutral with a splash of colour here and there. When you stick to a simple colour scheme, decorating is super easy. This year, I chose to do white on white. I piped random markings on each of the cookies with no set plan. I just had fun and tried different ideas. Some look better than others, but you can see how the simple scheme helps to hide my mistakes as well. The only other embellishments I added were those tiny silver/pink candy balls and a bit of clear decorating sugar.

If you are interested in learning to blog, do not miss this opportunity to learn how the pros blog with a revolutionary new blogging platform.  Click here to learn more.

Cookie Decorating

Did you ever wonder how you get that beautiful smooth surface on a sugar cookie? It is actually relatively easy to do. The key to getting that look is using Royal Icing. It dries hard and smooth, and makes a great surface for piping or adding extra detail.

Royal Icing Recipe

Ingredients:

3 egg whites
4 cups icing sugar
1 teaspoon cream of tartar
1 Tablespoon water
1 Tablespoon corn syrup

Beat egg whites until foamy. Add cream of tartar and beat well. Add the balance of the ingredients and beat until glossy.

Creating the Smooth Surface:

  1. Using a small round tip (#1), pipe around the exterior of the shape you wish to fill with some of the prepared icing.
  2. Take a portion of the Royal Icing you prepared and place it in a separate bowl. Thin it with water, adding only a few drops at a time. The consistency you are looking for is slightly runny. To check if you have the right consistency, use the “10 second rule.” Drag a spatula through the frosting to make a path. Count how many seconds it takes for the surface of the frosting to fill the path and become completely smooth again. It should take approximately 10 seconds… if it takes more time than that, your frosting needs more water added. If it takes less time, your frosting is too thin and you will need to stir in additional icing sugar to thicken it. This icing will be used to “flood” the interior of the piped shape. You can either carefully drop it from a spoon into the piped area and spread it to the edges, or fill a decorating bottle and use a round tip #2 to fill (flood) the interior. For a more in-depth tutorial, check-out this link.
  3. You will want to use a toothpick to pop any air bubbles that appear on the surface. It also helps if you very gently tap the cookie on the counter to help the icing smooth out nicely before setting.

Once the cookies have been flooded and the air bubbles removed, you will want to let the cookies set for several hours before adding any additional details to them.

*This icing is also ideal for holding the pieces together when making a gingerbread house.

If you are interested in learning to blog, do not miss this opportunity to learn how the pros blog with a revolutionary new blogging platform.  Click here to learn more.

Stained Glass Cookies

I have seen many pins on Pinterest highlighting Stained Glass Cookies. I have never tasted a stained glass cookie, let alone made them, but really wanted to see if they were as simple as the instructions imply. Like most people, I have a basic list of recipes that I make every Christmas, but often add one or two new ones to the mix. In reading over several of the recipes, I noticed that the cookie itself seemed to be a pretty basic sugar cookie type of recipe. I have used the same Brown Sugar Cookie recipe for years and seldom try others, because these are so yummy. Of course, the finished cookie is slightly brown (darker) than a standard sugar cookie. I decided to use my own Brown Sugar Cookie recipe and then add the “stained glass” to it.

Brown Sugar Cookies

Ingredients:

1 cup of butter
1 cup of  brown sugar
1 teaspoon of vanilla
1 egg
2 1/2 cups of flour
1/2 teaspoon of baking soda

Method:

Preheat the over to 360 degrees. Cover and refrigerate for 1 to 2 hours, so that the dough is easier to work with. Flour your counter top and roll out dough. Press with a cookie cutter. Bake for 6 minutes.

Tips:

When rolling cookies, I use two sheets of parchment paper and stick the dough between them. I then roll out the dough by rolling on top of the top sheet. This creates a beautiful smooth texture and prevents the dough from sticking to the rolling-pin (if the dough seems to be super sticky, you may need to add a bit of flour or corn starch to the parchment paper to prevent it from sticking to the paper, but this is generally not necessary). Peel off the top layer and proceed to cut the cookies. I also find that it is super easy to remove the cut cookie from the parchment paper and transfer it to the cookie sheet. This avoids that mushy mess you get when you try to remove the cut cookie directly from the counter.

Sometimes I even roll my dough directly onto my stone. Place a layer of parchment paper over top and roll out the dough to cover the entire sheet or stone.  Cut the cookies so that you are leaving ample space between for baking. Once cut, peel off the extra dough from around the pieces and your cookies are on the tray and ready to go directly into the oven with no need to transfer them!

Stained Glass Cookies:

To make the stained glass cookies, simply use another cookie cutter (something small) to cut out the center of your cookie. (I was thinking that the base of a decorating tip would work well, but I didn’t think of it until after I had started mine, so I stuck with what I had started with).  Set the cut-out cookies (with holes in the middle) onto a foil lined baking sheet. Fill each hole with a mound of broken hard candies. I used Jolly Ranchers. I also tried one with a broken candy cane, but didn’t really like the look. Follow the baking instructions for the cookie recipe and let cool completely on the tray before attempting to remove them. Decorate as desired. I piped on some left over Royal Icing I had on hand from the gingerbread houses we made at youth group on Friday night. I found one star cookie in Google images that I really liked. I used it for my basic plan and then just got creative and did my own thing. A little whimsical and a whole lot of fun!

If you are interested in learning to blog, do not miss this opportunity to learn how the pros blog with a revolutionary new blogging platform.  Click here to learn more.

Ginger Snap Cookies

I am not quite sure why these are called Ginger Snap Cookies, there is no snap. These cookies are super moist and chewy, you know the melt in your mouth kind. I always make these at Christmas, but my family loves them, so we make them several times throughout the year as well. We are doing a baking evening and cookie exchange with Eden’s Girl Guide unit on Monday evening. I think baking 12 dozen cookies in two hours might be pushing it slightly. I think we’ll do a few batches on Sunday and leave a batch or two for the Monday evening baking blitz.

Ginger Snap Cookies

Ingredients:

Ginger Snap Cookies
2 cups of flour
1 Tablespoons ginger
2 teaspoons baking soda
1 teaspoon cinnamon
1/2 teaspoon salt
3/4 cup of shortening
1 cup sugar (+ extra for rolling balls in)
1 egg
1/4 cup molasses

Method:

  • Cream sugar and shortening.
  • Beat in egg and molasses.
  • Sift dry ingredients and add. Mix.
  • Form into small balls and roll in sugar. B
  • Place balls 2 inches apart on an ungreased cookie sheet.
  • Bake at 350 degrees for 10 to 12 minutes. (Cookies flatten themselves as they bake.)

WARNING!

Let cool and then place in freezer immediately to avoid the potential tummy ache that may result from eating the whole batch fresh out of the oven! No kidding, these have a serious addictive property and may result in weight gain.

Pumpkin Chocolate Chip Loaf

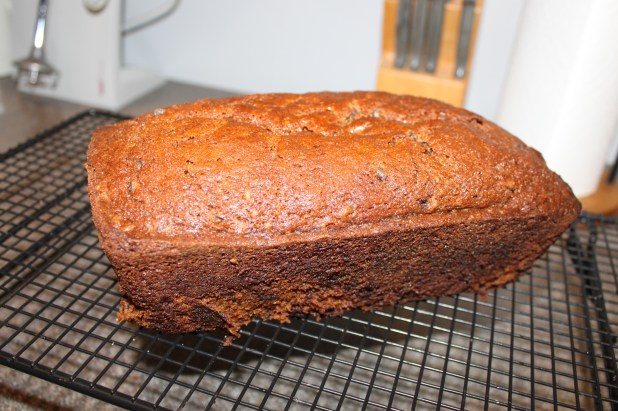
Okay, I am  officially hooked on all things pumpkin. I tried a new recipe for pumpkin loaf on Monday and my family devoured the first loaf in one day. Generally speaking, Eden isn’t overly enthused with most of my new recipes, in fact, sometimes I think it is her mission to “snub” them.  She will usually try my new recipes and often finish one serving, but rarely asks for seconds or offers any praise, despite the taste. Well, let me tell you this pumpkin loaf passed the “Eden test” with flying colours!  Not only did she gobbled up most of the loaf, but when I got home from work yesterday, she had already removed the second loaf from the freezer. She was raving about it and asked when I was going to make it again. I love the crusty texture on the outside and the moist “cake” on the inside of the loaf.  Slap on some butter and it’s like a give straight from heaven.  The loaf actually seemed to taste even better the second day. Is that even possible? This is a definite keeper and a must try ~ thanks to The Twisted Chef for another great recipe. (I believe the original recipe was found in Baked: New Frontiers in Baking by Matt Lewis and Renato Polafito.)

Pumpkin Loaf

Pumpking Chocolate Chip Loaf

Ingredients:

3 1/4 c. flour, sifted
2 tsp ground cinnamon
1/2 tsp freshly grated nutmeg
1/2 tsp group allspice
1/2 tsp ground ginger
2 tsp baking soda
2 tsp salt
1 3/4 c. pumpkin purée
1 c. vegetable oil
3 c. sugar (She used 1 c. white & 2 c. brown)
4 eggs
1 tsp vanilla extract
2/3 c. water, room temperature
1 1/2 c. chocolate chips

Preheat your oven to 350 F. Spray two 9 inch loaf pans with non-stick spray. Set aside.

In a medium bowl, whisk together the flour, cinnamon, nutmeg, allspice, ginger, baking soda and salt. Set aside. In another, larger bowl, whisk together the pumpkin purée and the oil until combined. Add the sugar(s) and whisk again. (There seems to be quite a bit of sugar in this recipe, but it does make two nice sized loaves, so I guess it isn’t so bad.) It’ll thicken nicely – now add in the eggs, one at a time, whisking after each addition, and then add the vanilla. Add the water and whisk until combined. Grab your rubber spatula and stir in the chocolate chips. Gently fold in the dry ingredients – try not to over mix.

Divide the batter between the two loaf pans. Gently tap the pans against the counter – it’ll remove any air bubbles and level out the top of each loaf. Bake at the centre of the oven – about 1 hour 20 minutes (give or take) – a toothpick or tip of knife should come out clean when inserted in the centre.

Transfer the pans to a wire rack, cool for about 15 minutes; then invert the loaves and cool completely. And then slice into it.

pumpkin loaf

This delicious pumpkin loaf recipe was borrowed from the Twisted Chef. Mmmm good!

If you are interested in learning to blog, do not miss this opportunity to learn how the pros blog with a revolutionary new blogging platform.  Click here to learn more.

Delicious Pumpkin Pancakes

In honour of American Thanksgiving, I thought I would give these 5 star rated Pumpkin Pancakes a whirl. Shay has a game this morning, so I thought I would get up, make scrambled eggs, bacon and pumpkin pancakes for breakfast. The recipe is super easy and other than the can of pumpkin, you should have everything in the house. So, all was going well and I was about 5 minutes away from waking up the sleepy heads in the house for a nice breakfast. Unfortunately, the fire alarm beat me to it. The worst part of the situation is that this is a very common occurence in our house. The smoke detector is absolutely in the wrong place and has this “6th sense” that magically detects when I am cooking. First of all let me set things straight….nothing was burning, there was no smoke (okay, maybe a little) and there was definitely nothing on fire. In all honesty, it is not uncommon for me to set the bells blazing on a weekly basis. I told my husband that the smoke detector is way too sensitive and that we should move it.  He doesn’t agree, perhaps because it doesn’t seem to be nearly as “sensitive” when he does the cooking! Ugh!  Anyways, you can imagine that my breakfast surprise did not go quite as well as I had planned .  Oh the pancakes turned out great. I loved them (all three).  Everyone else woke up grumpy. Oops! (I think the alarm company has some kind of a star beside my name and the words *just cooking printed beside it. Last time they called, they actually gave me a secret code to turn it off manually ~ how embarrassing.)

pumpkin pancakesLight and Fluffy Pumpkin Pancakes

Ingredients:

Servings:  4

1 1/4 cups all-purpose flour
2 tablespoons sugar
2 teaspoons baking powder
1/2 teaspoon cinnamon
1/2 teaspoon ginger
1/2 teaspoon nutmeg
1/2 teaspoon salt
1 pinch clove
1 cup 1% low-fat milk (can be any kind and I ended up adding a touch extra to thin the batter slightly)
6 tablespoons canned pumpkin puree
2 tablespoons melted butter
1 egg

Directions:

1. Whisk flour, sugar, baking powder, spices and salt in a bowl.
2. In a separate bowl whisk together milk, pumpkin, melted butter, and egg.
3. Fold mixture into dry ingredients.
4. Spray or grease a skillet and heat over medium heat: pour in 1/4 cup batter for each pancake.
5. Cook pancakes about 3 minutes per side. Serve with butter and syrup.
6. Makes about six 6-inch pancakes.

This recipe was borrowed from food.com

Pork Mushroom Casserole

We got this recipe from a brochure put out by the Manitoba Hog Producers many years ago. It is very good and the paprika adds a bit of zip to the recipe. The mushroom gravy is great on both rice and potatoes.

pork mushroom casserole

Pork Mushroom Casserole

Ingredients:

4-6 loin chops (3/4″ thick)
Salt, Pepper and Paprika to taste
2 T. butter
1/2 cup chopped celery
1/2 cup chopped onions
1 T. parsley flakes
1 can of mushroom soup
1 can of mushroom stems and pieces (we use fresh)
1/3 cup milk

Season chops with pepper and paprika. Sauté chops at low temperature in butter until brown. Season with salt. Transfer chops to baking dish. Combine celery, onions, parsley, soup, mushrooms and milk. Pour the mixture over the chops.  Cook covered in the oven for 30 minutes at 350 degrees. Turn the chops and cook for another 30 minutes or until the chops are done and the meat is no longer pink. Makes 4 to 6 servings.

Love to blog?  Learn incredible blogging tips and use this revolutionary new platform to create easy posts from your hand-held device. Follow the link to learn more.

Broccoli Apple Soup

As a soup lover, I am always on the hunt for new and delicious recipes. I found this recipe online several years ago and it has become a staple in our menu. I love the combination of flavours and you never have to worry about it turning out bland. It is thick and delicious and super easy to make.

broccoli apple soup

This isn’t the best photo. I was racing out the door to hockey and thought I should snap a picture. If the truth be told the edge of the bowl is a little messy because it was not until my second helping that I thought about taking a picture.

Broccoli Apple Soup

Ingredients:

  • one large head of broccoli
  • 2-3 Granny Smith apples; peeled, cored and chopped
  • 50 g (2 oz). of butter
  • 1 chopped red onion
  • 750 ml of vegetable stock
  • pepper to taste
  • 3 oz. of cream
  • grated cheddar
  • croutons

Method:

  1. Discard the tough stem from the broccoli and coarsely chop.
  2. Melt the butter. Sauté onions and apples for about 10 minutes.
  3. Add the stock and broccoli. Bring to a boil, cover and simmer for 15 minutes.
  4. Purée the soup. Return to the saucepan and heat slowly. Add pepper and cream.
  5. Serve with grated cheddar and croutons.

This Broccoli and Apple Soup recipe was originally found on Brittania.com.

If you are interested in learning to blog, do not miss this opportunity to learn how the pros blog with a revolutionary new blogging platform.  Click here to learn more.